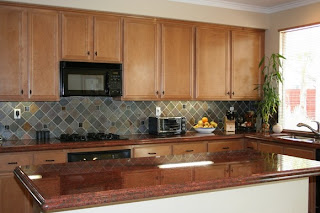
Things Required to Install Slate Tile Backsplash
- Tiles Cases (about 50 tiles per case). The number of cases required depends upon the area you want to cover. The cost of one case is approximately $11.
- Three tubes of adhesive
- One bag of Type S High Strength Mortar/Stucco Mix Gray
- Loctite Power Grab
- Angle Grinder
- Dry tile saw blade
- Paint brush
- Caukling gun
- Black permanent marker
- Safety glasses
- Cement backer board
Tips to Install Slate Tile Backsplash
- Before buying anything check your wall. It should be strong enough to hold the weight of slate tile and if you are using 12x12” slate tiles then first of all fix the cement backer board on the wall with screws. Use backer screws at every six inch for the proper fixing.
- Now if you want the sealant then better to apply it before slate tile installation. Apply it one day earlier and let the tiles dry completely.
- Make the plan on how you want to install the tile. Before actually placing it on backsplash better to make the arrangement of slate tiles on the floor or other solid surface. Here you can go for the color combination and style.
- Wear safety glasses and put Loctite Power Grab adhesive in caukling gun.
- Find the center of the backsplash wall and mark it with the marker. You first slate stone tile will appear there and then you will place the other on left or right side of it. Place the slate tile in a regular manner and give proper space in between tile. For this you can use tile spacer. Also there should be space between the countertop and slate tile. Use the adhesive you have made to glue the tiles on wall.
- Make the second and third row in the same manner.
- For the last row the slate tiles need to be cut according to the available space. With this your slate tile placing is complete.
Grouting
- Before grouting let the slate tile dry. Now prepare the mixture for grouting. For this add right amount of water into grout powder and its consistency should be like peanut butter. If yes then your grout mixture is ready to use.
- Apply it on the whole surface of the slate tile backsplash and force it to the gaps in between tiles and walls. After completion, allow it to set for at least 20 mins. Now wipe the extra grout from the surface and sides. But do not do anything to the grout line.
- Wait for 72 hours after this and then apply penetrating sealant over the slate tile backsplash.
Slate Sealer
Slate Backsplash
Slate Flooring

Nice work .Thanks for the share. Keep up writing so that we can get more informative blogs like this one.
ReplyDeleteslate tile flooring
This is a nice touch to add to your kitchen it looks like! I wonder if we can match the slate tile flooring to our countertops. Do you think we can get a similar match custom made?
ReplyDeletehttp://www.stonetilewarehouse.net.au
Thank you for sharing your expertise on installing slate tile backsplash! Atlanta Tile Installer
ReplyDeleteNice post!!
ReplyDeletenatural slate stone